• About US & Thistle Dew Books
  • Book Shoppe
  • COPYRIGHT NOTICE
  • Emporium
  • Farm Photos
  • Historic Interpretation
  • List of Articles on TheHistoricFoodie’s Blog
  • Motorcycles are Everywhere, Please Drive Safely©
  • PROGRAMS, DEMONSTRATIONS & LECTURES: Martin and Vickie Can Provide

Thehistoricfoodie's Blog

~ An enjoyable ramble through the world of Historic Foods and Cooking to include Gardening History, Poultry History, Dress, and All Manner of Material Culture.[©]

Thehistoricfoodie's Blog

Category Archives: 19th century food

Upland Rice for Home Production©

14 Friday Aug 2020

Posted by thehistoricfoodie in 17th century food, 18th century food, 19th century food, gardening, Self-sufficiency, Uncategorized, Upland rice

≈ Leave a comment

300px-Upland_rice_differences

Rice might not come to mind when discussing American food crops, however, it has been grown here since the late 1600s.  There are two types of rice – one is an aquatic “lowland rice” and the other is “upland rice”.  The primary reason for growing in water is weed control – rice grows in water while weeds do not.  Upland rice will grow with decent rainfall much as do cotton or corn.

Rice has been grown primarily in South Carolina, Georgia, Louisiana, Texas, and western Tennessee but they are not the only states with a rice culture.  Today rice is grown commercially primarily in Arkansas (the U.S.’s top producer), California, Missouri, South Carolina, Georgia, Louisiana, and Texas but has been successfully grown in Florida and as far north as Vermont and Maryland.  Cooler climates will need to start the rice in seed trays and transplant the plugs when plants are at about three weeks growth.

The origin of rice growth in America dates from 17th century South Carolina.  “The cultivation of rice spread rapidly from the beginning into most of the Southern States, and even so far north as Missouri, Tennessee, and Illinois.”

Upland rice culture in Mobile was reported in the American Farmer in January 1824.  The author stated he saw no real difference in the bearded rice and the smooth and grew both.  He noted the bearded had a larger head and larger grain and he felt it was far more productive.

Upland rice was submitted by a farmer in Grand Bay, Alabama which met with praise from the proprietor of the Empire Parish Mill in New Orleans in 1871.  “The rice sent by you to our mill will compare favorably, as to the grade and yield, with the best ever raised in Louisiana and will command the highest price in our market”.

“All qualities and descriptions of land have been sown in rice, from the stiffest of clays to the lightest sands, with apparently equally profitable results…”.

South Carolina planters said in 1851 that they planted the upland rice and cared for it just as they had corn but thought the rice produced more food for their families.  Crab grass could choke out the rice until it grows large enough in a few weeks to make do on its own.  The same writer noted that the rice was as easily transplanted as onions.

Upland rice culture was rapidly increasing in all the flat country bordering the Gulf and Atlantic in the 1870s with some saying the white was the best for upland areas while the famous gold rice of South Carolina and Georgia was the best for water culture.

Growers reported that following the War Between the States as Louisiana’s sugar production plummeted, the production of rice exploded from 7,000 to nearly 30,000 barrels.  Comments on the successful production of upland rice as good as, “that which is raised in the swamps of Georgia and South Carolina”, were found in numerous publications including “The Southern Farmer”.

“This has been proved beyond a question in Alabama where for many years upland rice has been raised with great success, yielding 50 to 100 bushels of shelled rice (rice with the husk on) to the acre…The big white, little white, and the red-bearded all do well on upland.”

Early on, South Alabama did not have facilities to process rice necessitating shipping to and from New Orleans, however, by 1871 it was said, “the cleaning or hulling can be easily performed with an ordinary pestle and mortar, and at very little expense three or four of these pestles and mortars could be so constructed to be run by the gin power which would clean a large crop with great expedition.”

In warmer climates, sow the seed where it is to grow after soaking in water for between one and five days, changing the water daily.  Plant one ounce of seed per 100 square feet soon after the last expected frost date.  There should be about four seedlings per foot with rows a foot apart.  Plan to use bird netting on T-posts over your crop so it doesn’t become bird food.  As with any open pollinated seed one can save seed from this year’s crop to plant again next year.

Harvest begins in late summer after the seed heads turn brown.  Cut the stalks and hang them up in a dry place to dry.  Thresh it as soon as it is dried.

Remove the rice from the stalk with a flail or by beating the stalks together over a clean sheet or piece of plastic or put the seed heads into a five-gallon bucket and use a drill with a paint stirrer attachment to separate the grains.  (Insert the stirrer through a hole in the bucket lid so the rice doesn’t fly out everywhere).  Scoop up the rice and drop it with a fan blowing to separate and blow away the chaff.  Spread the rice in the sun to dry or it can be dried in a low temperature oven.

An article published in 1924 touches on hulling rice.  “The hulls are removed by passing the grains between revolving millstones, set apart about two-thirds the length of a rice kernel…”.  The idea is to strip off the hull without crushing the rice grains.

aged-cajun-woman-using-crude-mortar-and-pestle-in-process-of-hulling-rice-near-1024

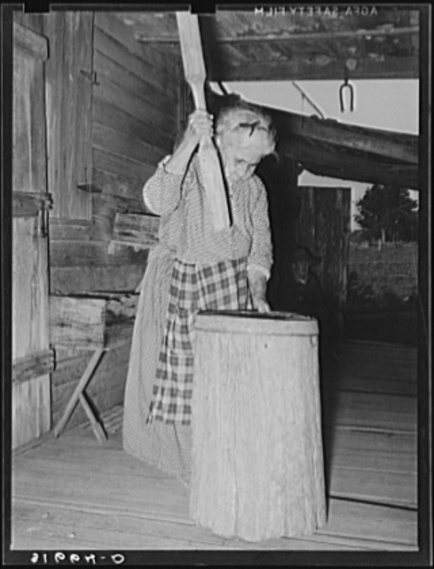
For home production the hulls can be removed by pounding with a rubber mallet or using a large old-fashioned mortar and pestle.  There are plans online for making an apparatus to do this and, sites offer hullers for purchase starting at roughly $150 on Amazon.  Some of the expensive grain mills can utilize a de-hulling attachment.  The attachment itself is $275.

rice hulling machine

The hulls may be used as mulch, soil conditioner, bedding for poultry, insulation, etc.  Rice straw can be used as feed, bedding for animals, mulch, and fertilizer.  From the “Mobile Register”, quoted in “Southern Farm and Home March 1873:  “…if you do not [have a hulling mill nearby] it will still pay you to grow it as a feed crop, for it bears two cuttings in the year below 32° north latitude and makes a hay which sheep, horses, and cattle prefer to the best grass product grown”.

In the following video we first see a demo of the huller being used followed by instructions on how to build it.  https://www.youtube.com/watch?v=YxWI5Mvw36Y.  https://www.youtube.com/watch?v=xpZxS3QoWTE shows the same machine with a motor attached.

This huller is made from a bench grinder.  One wooden grinding wheel stays stationery while the other is turned by the bench grinder.  There are some in use in third world countries that utilize one such grinding wheel turning against a plain rubber wheel.  https://www.youtube.com/watch?v=-fnP-y8_Asg

A manual on growing upland rice: http://www.fao.org/fileadmin/user_upload/ivc/docs/uplandrice.pdf

Seed may be purchased from Nature and Nurture Seeds, AmkhaSeed in Colorado, Experimental Farm Network (as nonprofit in Philadelphia), Sherck Seeds in Indiana, Fedco Seeds, Wild Folk Farm in Maine (they do sell varieties suited to the South as well), Southern Exposure Seed Exchange (they also have a tutorial for growing upland rice), etc.

The Carolina Gold rice seed offered by Baker Creek is a paddy type rice requiring flooding for cultivation.

Blissful Meals and Enjoyable Gardening should readers want to try their hand at rice culture!

Advertisement

“Dutch” Case-knife Beans: A Taste of History©

01 Wednesday Jul 2020

Posted by thehistoricfoodie in 17th century food, 18th century clothing, 19th century food, Colonial foods, gardening, Heirloom seed, historic food, Uncategorized

≈ Leave a comment

Tags

case-knife beans

Palatine June bean

Photo:  William Woys Weaver, Roughwood Seed Collection

I once had someone who was viewed as an amateur historian tell me that people did not eat dried beans in the 18th century.  What?  I’ve never forgotten that and today we will debunk that theory.

The earliest description this writer found for a white-seeded bean that matches the description of what was later called the case-knife bean was written by Nicholas Culpepper in 1666.  “…but white is most usual; after which come long and slender flat cods, some crooked, some straight, with a string as it were running down the back thereof, wherein are contained flattish round fruit made to the fashion of a kidney…”.

Amelia Simmons was perhaps the earliest cookery book writer to document white beans for drying (1796) and Simmons listed a “clapboard” bean which some think was the case-knife.  She advised they must be poled and were, “the easiest cultivated and collected, are good for string beans, will shell”.

Philip Miller said in 1775 the Dutch White Beans were much the sweetest for the table.  He thought them “extream [sic] windy Meat” and recommended preparing them in the Dutch fashion of half boiling them then “you husk them and stew them… they are wholesome food”.

John Reid wrote of beans in 1683, “Beans and peas boyled with savory and thym[e]…served up with sweet butter beat amongst them and set a little on a coal or chaffing boyl [sic]”.  – “The Scots Gard’ner”.

A farmer wrote in 1840 that the “prettiest” way to grow dry beans was to raise white pole beans and, “The common case-knife beans are excellent for this purpose”.  Twenty-three years later Fearing Burr told his readers the case-knife was “common to almost every garden” and it remained so into the early 20th century.  Today the white-seeded variety of case-knife bean isn’t as common, at least by that name, but close versions can be found.

“Some Dutch case-knife beans did come up and grew finely…In good time they were heavily loaded, and they were of rich and splendid flavor, so much so I forbade wife cooking any more, having visions of acres of beans and a big bank account”.  One will pity this poor farmer when he explained that a mere few days before he went to pick his dried beans they had been beset upon by weevils.

“The manner of saving the seeds of these plants, is to let a few rows of them remain ungathered in the height of the season; for if you gather from the plants for some time, and afterwards leave the remaining for seed, their pods will not be near so long and handsome, nor will the seed be so good.  In autumn, when you find they are ripe, you should in a dry season pull up the plants and spread them abroad to dry; after which you may thresh out the seed and preserve it in a dry place for use”.  – Miller, Philip.  “The Gardener’s Dictionary”.  1768.

Buist [1805-1880] proclaimed the Dutch Case-knife to be an excellent pole bean producing a good crop of fine flavor and much earlier for the table than either the Lima or Carolina.  “It can be used either in or without the pod; it is also adapted for winter use”.

Mr. W. F.  Massey submitted information on white beans and their culture in the hot humid South for the Southern Planter and Farmer in 1900 saying they produced more damaged beans than when planted in the North.  He stated the best white beans he’d ever tried growing in the South were the Dutch Case-Knife beans.  “This is a pole bean, but not a rampant climber, and in my boyhood was commonly planted in the corn field and allowed to climb on the stalks in a portion of the field so as to give a supply for shelling in winter.  It is a flat bean, similar in shape to a small lima, but smaller still.  There is no shelled bean of better quality.”

As for the method of growing these beans they could be trellised or staked.  The following would make a nicer presentation than row staking.  “Strike out a dozen (or more) circles on the ground, as large as a cart wheel.  Put a wheel barrow load of manure into it and spade it up with the earth.  Drop the seeds in the circle, on the outer edge of the hill, say six inches apart.  Then insert eight or ten poles just within the circle, at equal distances from each other, and tie the tops of the whole together-forming a cone.  Cover up the seed and wait the result.

Each of these hills will yield you a peck or a half bushel of dry beans next fall—which if you have but a dozen such hills, will give you, perhaps half a dozen bushels.  This will be enough for your purpose.  By this course, but a little land is occupied.  Pole beans will yield very much more abundantly than bush beans, and occupy air, whilst the latter must have the surface of the earth”.  – Holmes, Frances.  “The Southern Farmer and Market Gardener”.  1842.

This bean was often referred to as Old Dutch White or White Dutch and differs from the brown-seeded variety sometimes sold as Caseknife today.  Old cookery books and garden manuals refer to white beans, small white beans, large white beans and great white beans.  All agree the white was preferred.

Dr. William Woys Weaver says the Caseknife Bean is perhaps the oldest documented bean in American gardens.  Like the farmers quoted above he believes the oldest were white seeded like those grown in the gardens of Thomas Jefferson and the closest variety to the original bean is the Pelzer Schwertebuhne (Palatine Caseknife Pole Bean).  He found the beans being grown by the Wendel family of Weilerbach in the Rheinland-Pfalz.  He offers the Palatine June Pole Bean in his Roughwood Seed Collection.

As to cooking dried white beans, let’s look at Louis Eustache Ude’s 1814 receipt.

White Beans a la Maitre d’Hotel.  “if they are dry, they must be soaked for an hour in cold water, before you boil them.  Then boil them in cold water and replenish with cold water also which makes the rind or coat tender.  White beans must be well done before you dress them, which is done as follows:  trim a stew-pan with a quarter of a pound of fresh butter, a little parsley chopped very fine, and some pepper and salt, over which lay the beans, well drained.  Keep moving the stew-pan without using a spoon, for fear of crumbling the beans.  Then squeeze the juice of half a lemon and send up quite hot”.

The Shop at Monticello offers seeds of the Caseknife Pole Bean which have white seed like the original and the flattened, slightly curving shape of the beans matches the description above.  They are grown out on-site.  A packet contains between 20 to 25 seeds and sells for $3.95 plus shipping.  1-800-243-1743.

Johnson’s Home and Garden offers “Old Dutch White Half Runner Bean” seed he says were brought from Germany by original settlers of the Dutch Fork Section of South Carolina.  A Half Pound of untreated seed is $3.95 and a pound is $5.95.  Johnson’s Home & Garden, 130 Power Drive, Pikeville, KY 41501, phone                   606-432-8460.

Roughwood Seed Collection:  https://www.roughwoodtable.org/roughwood-seed-collection offers the Palatine June bean seed.

GROUND NUT, aka hopniss, Indian potato, potato bean, openauk, vine potato.©

25 Monday Feb 2019

Posted by thehistoricfoodie in 18th century food, 19th century food, Colonial foods, gardening, historic food, homesteading, Uncategorized

≈ 4 Comments

Tags

apios Americana, groundnut

P8180876

Ground nut is a North American native and produces a tuber similar to a potato.  It is edible as are the beans, shoots, and flowers the plant produces.  In 1585 Thomas Harriot said of it, “Openauk, a kind of root of round form, some of the bigness of walnuts, some far greater, which are found in moist & marish [sic] grounds growing many together one by another in ropes, or as though they were fastened with a string. Being boiled or sodden they are very good meat…”.

groundnuts-closeup

One can hardly read a natural history, book of Indian lore, or an account of pioneers or mountain men without finding a reference to hopniss (the Lenape word for the plant) or Indian potato.  Accounts as early as 1626 call it Indian potato and by 1787 it was Apios Americana.  Lewis and Clark described it in their journals.  The name varied with tribe but each used it as food and as a medicinal.

ae02a446060d932c_0272-w500-h321-b0-p0--

Modern day permaculturists praise the plant, but it is nothing new to history.  The noted botanist, Peter Kalm, recorded the plant he called hopniss in his journal in March 1749, written from Raccoon Creek New Jersey.  “Hopniss or Hapniss was the Indian name of a wild plant which they ate at that time.  The Swedes call it by that name, and it grows in the meadows, in good soil.  The roots resemble potatoes, and are boiled by the Indians who eat them instead of bread.  Some of the Swedes, at that time, likewise ate this root for want of bread.  Some of the English still eat them instead of potatoes, but likewise take the peas that lie in the pods of this plant and prepare them like common peas.”

Further, Parkman in “Pioneers of France” stated that Charles de Biencourt and his followers at Port Royal [Acadia, New France, now Canada], in 1613, were scattered about the woods and shores digging ground-nuts.  Jacob Cornutus published a history of the plants of Canada in Paris in 1635 in which is found the ground-nut.   Jane Loudon included the plant in her “The Ladies’ Flower-garden of Ornamental Perennials” and in discussing the edibility of the tubers noted that the plant had been introduced in England before 1640 and was cultivated in Germany (1843) where the tubers were sold in markets.  Whittier spoke of “Where the ground-nut trails its vine” in his “The Bare-footed Boy”.

Henry David Thoreau wrote about these tubers in his journal.  October 12, 1852. I dug some ground nuts with my hands in the railroad sand bank, just at the bottom of the high embankment on the edge of the meadow. These were nearly as large as hen’s eggs. I had them roasted and boiled at supper time. The skins came off readily, like a potato’s. Roasted they had an agreeable taste, very much like a common potato, though they were somewhat fibrous in texture. With my eyes shut I should not have known but I was eating a somewhat soggy potato. Boiled they were unexpectedly quite dry, and though in this instance a little strong, had a more nutty flavor. With a little salt a hungry man could make a very palatable meal on them.

On March 17, 1849 an article on apios tuberosa was published in “The Gardener’s Chronicle” which discussed its introduction to Ireland during the potato famine.  “The apios has a curious underground vegetation; its roots are the size of a quill pen, cylindrical, running horizontally under the soil, but close to its surface, and are often two meters long, and sometimes much longer than that.  Here and there the roots swell insensibly; the swellings gradually become spindle-shaped, grow larger, become filled with starch, and form true tubers.  The swellings are sometimes close together, so as to form a sort of chaplet.”  The woodcut that accompanied the article was a fine likeness.

As to flavor the tubers were compared to a chestnut or potato with a bit of artichoke, “which is by no means unpleasant”.  It is almost certainly the Jerusalem artichoke being discussed as other 1840’s sources specify such.

A research team at Southern Louisiana State University invested twelve years in improving the size of the tubers and the number of tubers produced per plant under the direction of Professor Bill Blackmon.  Unfortunately the research was abandoned after Professor Blackmon left the university so we aren’t likely to see them perfected to the point that they are cost efficient to grow commercially.  The tubers going into our garden were ordered from Sow True Seed and were cultivated from that improved LSU stock.  At least two universities have done studies on the nutrition-packed tubers and found they contain significant isofavones, chemicals linked to a decreased incidence of prostate and breast cancers.

Plants are drought tolerant and perennial.  It is slow to establish itself and tubers should not be harvested its first year.  In fact some growers recommend waiting until the third year to harvest tubers.  Tubers grow on a stringy root and resemble beads on a necklace.  The tubers may be some distance from where the plant grows so it is best to start at the plant and follow the string wherever it goes.  Descriptions of growth habit vary from a vine that grows to six foot long to twenty feet.  It is a nitrogen fixing plant meaning it pulls nitrogen from the soil to the surface where it can nourish nearby plants.

The vine is thin, covered with fine hair and rather tough for its size.  Leaves are pinnately compound with three to nine two-inch leaflets (3, 5, 7, or 9) with no teeth.  The flowers are a lavender/brown color and fragrant.  Tubers vary in size from dime size up to grapefruit size, though the larger tubers usually average about the size of an egg.  Second or third year tubers are the largest.  Those can be harvested and the smaller ones replanted.  Tubers can be dug any time of year, but the tubers are sweetest in the fall.  Seeds grow in a pod and can be harvested before they dry enough that the pod shatters sending seed everywhere.

Seeds do not always germinate well, however, and the plants are usually started from tubers planting them individually or in strings.  Suckers can come up some distance away from the host plant.  Vines can be pruned to keep them from spreading too much.

“Most of the research involving cultural practices has been directed towards developing techniques to screen large numbers of plants. Direct-seeding has presented problems. Seeds may take 10 to 30 days to germinate. Seedlings are small and early seedling growth is not vigorous. Seedling death, presumably from insects or diseases, has plagued this technique for starting apios. The most satisfactory method has been to start plants in peat pellets. After germination, when the shoots begin elongation, the plants are pinched back to the first leaves. This prevents the plants in a flat from twining on each other, allows for better root development prior to planting, and permits plants from slower germinating seed to reach sufficient size to transplant. However, pinching back carries a potential risk of spreading disease among the seedlings. Weak seedlings can be discarded at this stage. 

Tubers are planted intact. The buds that give rise to the shoots and rhizomes occur at the distal end of the tubers. The potential of dividing tubers into sections prior to planting needs evaluation. Generally the larger the tuber, the more rapid the early growth.  Seeds may be harvested from the time the pods first begin to dry. If left on the vine too long some pods will shatter.  Tubers are harvested after frost. Since most of the plants are different (originating from seeds), the tubers are harvested with a shovel to insure that genotypes can be evaluated individually. Fortunately, tubers can remain in the soil for extended periods without rotting even under water-logged conditions, thus allowing an extended harvest period.

Although apios in its native habitat is found growing on water-logged and acidic soils (Reed and Blackmon 1985), observations under field conditions indicate that apios grows best on well-drained soils. A pH less than 5 or as high as 8 may also be detrimental to growth. Adequate moisture is important, but excess moisture encourages longer rhizomes.”  Perdue crop proceedings 1990. 

Eat them boiled, roasted, or slice and fry them after boiling.  Tubers can substitute for potatoes in any dish though the flavor has been described as nuttier than potato and they can be cooked peeled or unpeeled.  The tubers can be dried, ground, and used like flour to add to bread or to thicken soup or stew.  The flowers are edible raw or cooked and the seeds can be shelled and cooked.  The seedpods can be cooked like green beans if harvested before they become tough and fibrous.  The tubers have a much higher percentage of protein than potatoes.

I’ve planted these along with Jerusalem artichokes and I’m watching to see if they come up.  As long as the chickens or squirrels don’t dig up the tubers I should be fine in which case I should have tubers I can harvest in two to three years.  Blissful Meals, friends, and happy gardening.©

“THE OLD POT-HERBS IN THE FLOWER GARDEN”©

07 Thursday Feb 2019

Posted by thehistoricfoodie in 17th century food, 18th century food, 19th century food, flowers, gardening, homesteading, Self-sufficiency, Uncategorized

≈ 4 Comments

Tags

cottage garden

366px-Illustration_Phaseolus_coccineus0

I envision a combination of beauty and function with regard to my principal flower garden this year as I intend to tuck herbs here and there into corners and bare spots transforming the existing garden into an old fashioned cottage garden.  The herbs will add to the floral fragrance wafting through the night air while they add beauty and grace through their own leaves and flowers, and, I ask you, who could not love stepping into the flower garden for a few pot-herbs to flavor the evening’s dinner?

20663865_10210256290183362_736045856052341194_n

While I have seen it quite clearly in my head through the dreary winter months, I am, after all, Thehistoricfoodie, so is there any historical basis for this co-mingling of flowers and herbs?  Yes!  I’m delighted with my plan and that it mirrors the author’s description in the article below just adds to my gardening giddiness!

I already have seed orders in for most of the flowers and herbs discussed below and intend to transplant some existing herbs.  Having found this article shortly after my second seed order went to Baker Creek Heirloom Seeds, I see I was remiss in not ordering hyssop.

My seed stash already contains lovage and sorrel, which, due to their size will grace the outer edges of the garden and purslane that will go into its own bed as it self-sows so readily.  Lacinto kale will add color and form to the garden and its leaves will certainly find their way into the soup pot.  Nasturtium is the epitome of beauty and function as its leaves and flowers are beautiful garnishes or salad ingredients and the buds can be pickled like capers.

The plants already at home in the garden include heirloom fragrant roses, daffodils, iris, daylilies, Echinacea, rudbeckia, phlox, verbena, blackberry lily, spider lily, rosemary, hollyhock, Sweet William, snapdragons, hyacinths, etc.  I love the following article because it so beautifully described what I have envisioned my garden will look like after I mix the herbs in with the flowers.

“The Old Pot-Herbs in the Flower Garden.  Some of these pot-herbs are beautiful things, deserving a place in any flower garden.  Sage, for instance, a half shrubby plant with handsome gray leaf and whorled spikes of purple flowers, is a good plant both for winter and summer, for the leaves are persistent and the plant well clothed throughout the year.  Hyssop is another such handsome thing, of the same family, with a quantity of purple bloom in the autumn, when it is a great favourite with the butterflies and bumble bees.  This is one of the plants that were used for an edging in gardens in Tudor days, as we read in Parkinson’s ‘Paradisus,’ where Lavender Cotton, Marjoram, Savoury, and Thyme are also named as among the plants used for the same purpose.  Rue, with its neat bluish green foliage, is also a capital plant for the garden where this colour of leafage is desired.  Fennel, with its finely-divided leaves and handsome yellow flower, is a good border flower, though rarely so used, and blooms in the late autumn.  Lavender and rosemary are both so familiar as flower garden plants that we forget that they can also be used as neat edgings if from the time they are young plants they are kept clipped.  Borage has a handsome blue flower, as good as its relation the larger Anchuss [?].  Tansy, best known in the gardens by the handsome Achilles Eupatorium, was an old inmate of the herb garden.  Sweet Cicely (Myrrhis odorata) has beautiful foliage, pale green and Fern-like with a good umbel of white bloom, and is a most desirable plant to group with and among early-blooming flowers.  And we all know what a good garden flower is the common pot Marigold.  From Elgood’s ‘Some English Gardens’.”  – The Garden.  Jan. 7, 1905.

A DINNER OF HERBS©

01 Friday Feb 2019

Posted by thehistoricfoodie in 17th century food, 18th century food, 19th century food, gardening, historic food, homesteading, Self-sufficiency, Uncategorized

≈ 6 Comments

Tags

culinary herbs, herbs

Herbs-culinary-at-market

As spring approaches I prepare to perfect my herb garden planting as many perennial culinary herbs as I can fit into corners of my flower garden or containers placed in empty spots so my thoughts turned to the old fashioned kitchen gardens.  The following is one woman’s ideas on using her herbs to prepare an entire dinner.  In addition to those discussed in the quote, the author also discussed growing and using tansy, marjoram, basil, balm, rosemary, clary, lavender, dill, fennel, angelica, anise, caraway, coriander, chervil, cumin, horehound, lovage, marigold, samphire, borage, rue, and winter savory.

images

“To prepare a dinner of herbs in its best estate you should have a bed of seasonings such as our grandmothers had in their gardens, rows of sage, of spicy mint, sweet marjoram, summer savory, fragrant thyme, tarragon, chives, and parsley.  To these we may add, if we take herbs in the Scriptural sense, nasturtium, and that toothsome esculent, the onion, as well as lettuce.  If you wish a dinner of herbs and have not the fresh, the dried will serve, but parsley and mint you can get at most times in the markets, or in country gardens, where they often grow wild.

Do you know, my sister housewife, that if you were to have a barrel sawed in half, filled with good soil, some holes made in the side and then placed the prepared half barrel in the sun, you could have an herb garden of your own the year through, even if you live in a city flat?  In the holes at the sides you can plant parsley, and it will grow to cover the barrel, so that you have a bank of green to look upon.  On the top of the half barrel plant your mint, sage, thyme, and tarragon.  Thyme is so pleasing a plant in appearance and fragrance that you may acceptably give it a place among those you have in your window for ornament.

The Belgians make a parsley soup that might begin your dinner, or rather your luncheon.  For the soup, thicken flour and butter together as for drawn butter sauce, and when properly cooked thin to soup consistency with milk.  Flavor with onion juice, salt and pepper.  Just before serving add enough parsley cut in tiny bits to color the soup green.  Serve croutons with this.

For the next course choose an omelette with fine herbs. . .added to it minced thyme, tarragon and chives. . .

Instead of an omelette you may have eggs stuffed with fine herbs and served in cream sauce.  Cut hard-boiled eggs in half the long way and remove the yolks.  Mash and season these, adding the herbs, as finely minced as possible.  Shape again like yolks and return to the whites.  Cover with a hot cream sauce and serve before it cools.  Both of these dishes may be garnished with shredded parsley over the top.

With this serve a dish of potatoes scalloped with onion.  Prepare by placing in alternate layers the two vegetables; season well with salt, pepper, and butter, and then add milk even with the top layer.  This dish is quite hearty and makes a good supper dish of itself.

Of course you will not have a meal of this kind without salad.  For this try a mixture of nasturtium leaves and blossoms, tarragon, chives, mint, thyme and the small leaves of the lettuce, adding any other green leaves to the spicy kind which you find to taste good.  Then dress these with a simple oil and vinegar dressing, omitting sugar, mustard or any such flavoring, for there is spice enough in the leaves themselves.

Pass with these, if you will, sandwiches made with lettuce or nasturtium dressed with mayonnaise.  You may make quite a different thing of them by adding minced chives or tarragon, or thyme, to the mayonnaise. . .

Whether this ‘dinner of herbs’ appeals to the reader or not, I venture to say that no housewife who has ever stuffed a Thanksgiving turkey, a Christmas goose or ducks or chickens with home-grown home-prepared herbs, either fresh or dried, will ever after be willing to buy the paper packages or tin cans of semi-inodorous, prehistoric dust which masquerades equally well as ‘fresh’ sage, summer savory, thyme or something else. . .”.

Blissful meals and Joyful Gardening!©

Source:  Kains, Maurice Grenville.  “Culinary Herbs”.  New York.  1920.

MUSCOVY FOR THE TABLE ©

25 Friday Jan 2019

Posted by thehistoricfoodie in 17th century food, 18th century cooking, 19th century food, Colonial foods, French food history, homesteading, poultry history, Uncategorized

≈ Leave a comment

Tags

Muscovy; Muscovy duck

Those unfamiliar with Muscovys may refer to my previous article.

Ralph

Our Muscovy drake, Ralph, approximately 1 1/2 years old.

Muscovy flesh was noted to be excellent in flavor.  Dixon wrote that the flavor was excellent if killed just before fully fledged [having wing feathers sufficient enough to enable the bird to fly], but it took longer in achieving growth for the table than the common duck.  “The flesh is at first high flavoured and tender, but an old bird would be rank and the toughest of tough meat.”

Most potential poultry growers eventually get down to brass tacks and ask about the meat harvested from this breed.  Muscovy meat is thinner-skinned, less fat, and deep red, often compared to beef in flavor and tender.  A Muscovy carcass is heavy for its size and the breast is larger than a Pekin.  Muscovy eggs are rich in flavor and excellent for baking.

gabler muscovy

  1. T. G. Carey, a Muscovy breeder in Australia said of his “aquatic fowl” they have more flesh upon their body than any other poultry. “. . . learn how to relish the juicy Muscovy duck-meat with green peas, and the trial must convince him or her how remunerative this proposition [raising Muscovys] may prove.” –

Robert Schomburg pronounced wild Muscovy flesh, “excellent eating”.  –

  1. W. Summers likewise noted that Muscovy were, “the best table fowl of any of the water-fowl variety”.

Marguerite N. de Freltas replied to a previously published comment in “Pacific Poultry Craft” advising that anyone reporting on fowl should have kept them long enough to know their habits and worthiness before submitting information to magazines and disagreed wholeheartedly with the writer of the previous article.  “. . . we eat the drakes at two years and consider them very fine—they are not ‘hard, dry nor rank’.  On the contrary, the family all decided that the last one we ate was better than the previous one of seven months. . . I can cook one of my birds at two years, and . . . it will be very good to eat”.  Dec. 1914.

Recipes specifying Muscovy are rare, probably because, as Todd Goodholme noted, Muscovy was among the various breeds, “which are very fine for the table” and as such any of the better breeds was suitable for preparation.  After all, chicken recipes do not specify a particular breed.  His recipes were noted suitable for any type of duck.

William Gibson likewise discussed Muscovys, and, under that heading, we find in his index, “To cook [a Muscovy].—See Duck”.

The following recipe from “Good Housekeeping” did specify using a Muscovy.

“The best duck for ordinary occasions when such luxuries as canvas back, red head, and teal are not to be thought of is a young Muscovy drake.  Choose a fat tender one; there is too little meat on a duck for it to be worthwhile to take the trouble to cook a tough stringy one.  Rub it well inside and outside, first with plenty of fine salt and black pepper, then give it a second rubbing with finely pounded sage, marjoram, and savory all equal quantities, pounded together, and sifted free of stalk and stem.  Always add a dash of cayenne inside and out to any meat or game that is being seasoned.  Make a stuffing of bread crumbs (either corn or wheat bread as preferred, that is a matter of taste. . .) about a pint, or more, according to the size of the duck in a bowl with a teaspoonful of powdered sage, marjoram, savory and black pepper, a small onion minced, or grated, which is better, two tablespoons of fresh butter, and enough sweet cream to moisten it into as soft a mass as can be handled. . . Stuff the duck well and sew it up, dredge it with flour and put it in a pan with half a pint of water, and half a pint of red wine, have the oven very hot, so the duck will cook quickly and be a rich brown when only about half done, for ducks are eaten quite half raw!  Baste it well with flour and butter on a larding mop, and pour over it from time to time the liquid in the pan.    When the ducks are taken up if the gravy is not thick enough add a little flour and sage rubbed together and allow it to come to a boil, then add a wine-glass full of walnut or mushroom catsup, a spoonful of sugar or currant jelly, the juice of half a lemon, a good dash of red pepper, and serve very hot.”

STEWED WITH GREEN PEAS.  [Goodholme]  Half roast the duck; skin it, and put it into a stew-pan with a pint of beef gravy [stock], a few leaves of mint and sage cut small, pepper and salt, and half an onion shred as fine as possible.  Simmer a quarter of an hour, and skim clean; then add about a quart of green peas.  Cover tightly and simmer about half an hour longer.  Add a tablespoonful of butter and as much flour, and give it one boil and remove from fire; serve with the peas around it on the dish.

DUCK RAGOUT.  1866.  Half roast a duck, then score the breast in three places at each side, lightly strew mixed spices and cayenne into each cut, and squeeze lemon juice over the spices.  Stew the bird till tender in good brown gravy; take it out and keep it hot; add one or two finely-shred shallots to the gravy, also a glass of red wine, and pour the gravy over the duck.

ROAST MUSCOVY DUCK.  1919.  (Served with apple sauce).  Clean a Muscovy duck, season with salt and pepper, and stuff with a piece of celery and two shallots chopped very fine.  Put the duck in a roasting pan with a sliced onion and carrot, add a little water, and put in a hot oven.  The water will evaporate quickly, and the fat from the duck will be sufficient to roast it.  Baste often.  When done place the duck on a platter, remove the fat from the pan, add one cup of stock and a spoonful of meat extract, boil for five minutes, and pour over the duck.

TO DRESS A DUCK WITH JUICE OF ORANGE.  1723.  Roast the Duck, till it is half enough; then take it up, lay it in a Dish, and cut it up so as to leave all the Joints hanging to one another.  Then take Salt and Pepper pounded, and put between every incision; also, squeeze in some Juice of Orange.  Then lay the Duck in a Dish upon the breast, and press it hard down with a plate; set it over the Stove for a little time; then turn the Breast upwards again, and serve it hot in its own Gravy.

Should your experience with Muscovys resemble ours, you will have quiet but friendly companions and their offspring should furnish your table with fine dining.  As always, Blissful Meals.

See:  – “The Cook’s and Confectioner’s Dictionary. . .”.  London.  1723.  – Hirtzler, Victor.  “The Hotel St. Francis Cook Book”.  Chicago.  1919.  – Philip, Robert Kemp.  “The Dictionary of Daily Wants”.  London.  1866.  – “Good Housekeeping”.  Feb. 1890.  – “Camp Life in the Woods and the Tricks of Trapping and Trap Making”.  1881.  – Goodholme, Todd S.  “Goodholme’s Domestic Cyclopaedia of Practical Information”.  New York.  1889.  – “Ducks and Geese”. Published by Reliable Poultry Journal Publishing Company.  1904.  Schomberg, Robert.  “Report of the Third Expedition into the Interior of Guayana”.  1837.  Queensland Agricultural Journal”.  May 1920.  – Brown, Edward.  “Races of Domestic Poultry”.  1906.

© May not be reproduced without the permission of the author.

CHEESE STRAWS: A Quick History©

30 Tuesday Oct 2018

Posted by thehistoricfoodie in 19th century food, historic food, homesteading, Self-sufficiency, Southern food, Uncategorized

≈ 3 Comments

Tags

Cheese straws

wemc3_fzec_003

One of my favorite finger foods is cheese straws.  I have little self-restraint when I have access to them.  Being the “historic” foodie, I’m honor bound to pass on a little knowledge today concerning this basic, but oh so divine, snack.  Join me as I stroll down memory lane.

Cookbooks often suggest serving cheese straws with salads or soup, others list them with appetizers, or occasionally served with raw celery.  In some instances they were served between the main course and dessert, perhaps with almonds or other nuts.  Occasionally one finds instructions for presentation such as, “When served, the cheese straws should be piled log fashion on a plate.”  Notice the 1930 recipe below in which the cook is told to cut some in rings and some in straw-shape.  To serve those the straws were inserted through the ring as noted in the photo.

3c437e60143e80dd5d9a8a41c35c1071

Cheese Crackers were the lazy housewife’s alternative to delicate cheese straws.  Butter, cayenne, salt, sometimes dry mustard, and cheese were spread on crackers, often thicker and harder than today’s saltine, and baked to a nice brown to melt the cheese.  Thick crackers were often split in half prior to spreading on the cheese mixture.

cheese_tasty

By the turn of the 20th century commercial products were available including Huntley & Palmer’s Cheese Straws Biscuits, Sunshine Cheese Sticks, Sunshine Cheese Wafers, and National Biscuit Company’s Al Fresco Cheese Wafers.  The price and quality varied widely with the quality and amount of cheese used.  A commercially product as good as the real thing baked at home was, and is, as hard to find as the proverbial needle in a haystack.

To study recipes for cheese straws is first realize the same product may go by different names.  For example, in 1828, Louis Eustache Ude’s recipe for Ramequins a la Sefton, is cheese straws made from puff paste.  “After you have made the pastry for the first and second course, take the remains of the puff-paste, handle it lightly, spread it out on the dresser, and sprinkle over it some rasped Parmesan cheese; then fold the paste in three, spread it again, and sprinkle more cheese over it:  give what we call two turns and a half, and sprinkle it each time with the cheese:  cut about eighteen ramequins with a plain round cutter, and put them into the oven when you send up the second course;  dish them the same as the petits pates, and serve very hot on a napkin”.

1837, repeated in 1847.  “The Cook and Housewife’s Manual”.   In a menu in this book we find Cheese Biscuits, however, there is no recipe given.  “. . . a silver bread-basket in the centre [of the table], in which rusks or cheese biscuits are served on damask or fancy-netted napkin. . .”

In 1864, “Cre-fydd’s Family Fare”, published in London, contained a typical recipe for cheese straws, exact in ingredients and method, but called them Cheese Biscuits.  There is no way to know for sure, but there is a good likelihood that the 1837 and 1847 versions were the same.

  1. “Godey’s Magazine”. October, 1865.  This issue of the popular magazine contained three recipes for Cheese Straws.  The first was, “half a pound of puff paste, three ounces Parmesan cheese, grated, a little Cayenne, salt, and pepper, roll it very thin, cut it in narrow strips, bake them in a moderate oven, and send it up very hot.

#2, “Take a quarter of a pound of flour, and two ounces of butter broken into the flour with the fingers, and rubbed in till quite smooth, two ounces of good cheese grated on a bread-grater, the yolks of two eggs, and the white of one; season to taste with Cayenne pepper and a small pinch of salt.  Mix all together, roll it out to the thickness of rather less than a quarter of an inch (say one-eighth), place it on a well buttered tin, and cut it with a paste-cutter into strips about the width of those used to put across an open tart, and four or five inches in length.  They must be removed from the tin with care, so as not to break them, after having been baked in a moderate oven for about five or six minutes.  Biscuits can be made of a mixture prepared in the same way by using biscuit tins for cutting instead of a paste cutter.”

  1. “Dainty Dishes, Receipts.” Pailles au Parmesan, or Cheese Straws.  Take six ounces of flour, four of butter, two of cream, three of grated Parmesan cheese, the slightest grating of nutmeg, two grains of cayenne, a little salt and white pepper;  mix the whole well together, roll it out, and cut it in strips the size and thickness of a straw.  They must be baked in a moderate oven, should be quite crisp, and of a pale colour.  Serve very hot in the second course.
  2. “The Official Handbook for the National Training School for Cookery.” The basic method for most of these recipes is the same and modern recipes are easily found so we will not trouble the reader with inserting it into every entry.  Ingredients for this version were 2 oz. butter, 2 oz. of flour, 2 oz. grated Parmesan, 1 oz. of grated Cheddar, 1 egg, salt and cayenne pepper.
  3. “Everyday Housekeeping”. Their version contained a quarter cup of bread crumbs with the flour, butter, and cheese and white pepper in addition to the cayenne.
  4. “One Thousand Salads”. This dandy gem of a cookery book contains 27 recipes for Cheese Straws, made in varying ways from strips of puff paste sprinkled with grated cheese and seasonings to mixtures like the 1877 version – flour, grated cheese (Cheddar and/or Parmesan), butter, egg yolk, salt and cayenne.  A few also suggest grated nutmeg or paprika.
  5. “Better Meals for Less Money”. One of the recipes in this book recommends the addition of 1/8 teaspoon [dry] mustard, reminiscent of versions of Welsh Rarebit.
  6. “Old Southern Receipts”. 2 ounces of flour, 3 ounces of parmesan cheese, yolk of one egg, a little pepper, cayenne, a little salt.  Mix the flour, cayenne, salt and cheese together.  Moisten with the egg and work into a smooth paste.  Roll out on a board one-eighth inch thick, five inches wide, five inches long.  Cut some of the paste in small rings—some in small strips one-eighth inch wide.  Place both on greased paper and bake ten minutes, or to a light brown.  Put the straws in bundles in the rings.  [Rings and straws were documented in some of the earlier recipes.]
  7. By WWII era recipes for Cheese Straws were virtually unchanged.

I leave you, as always, with a fond wish for Blissful Meals and an invitation to visit often.  – Victoria Brady, The Historic Foodie.©  All Rights Reserved.

Lettuce Through Time©

07 Friday Sep 2018

Posted by thehistoricfoodie in 17th century food, 18th century cooking, 18th century food, 19th century food, Colonial foods, gardening, Heirloom seed, medieval food, period food, Uncategorized

≈ 3 Comments

Tags

braised lettuce, Cooked lettuce, lettuce history, lettuce soup


A nice gentleman contacted me recently with a question about 18th century lettuce and I promised to share some information.  His question was about period recipes for cooking lettuce and whether lettuce then was anything like what we have now.

Long leaved, cos type lettuce is ancient and depicted in wall and tomb paintings as early as 4500 B.C.  Lettuce is found among plants accompanying the Egyptian god, Min [4th Millennium BCE].

9e0da6fb7c5509b9b58854abd7639209

Cabbage-leaved lettuce is traced from 1543.  Columella knew a few different varieties, and documented the Romans eating young tender lettuce and cooking older and tougher lettuce.  They ate lettuce with hot dressing on it much like the wilted lettuce salads popular in the 20th century.  Lettuce was cultivated to improve its texture and flavor and by the medieval era there were distinct varieties of three types – heading, loose-leaf, and tall or cos.  William Woys Weaver credits the name Romaine, a cos, to it being grown in the papal gardens of Rome, although the name Romaine isn’t commonly found until the latter third of the 19th century.

“Adam’s Luxury and Eve’s Cookery”, 1744 is a good early source showing varieties during the 18th century.  Some of those listed are available through heirloom seed companies.  Dr. Weaver, in his heirloom vegetable treatise, tells us some of the early varieties later underwent name changes requiring some gardening knowledge to identify them and locate seed.  For example, Green Capuchin is now Tennisball and Silesia is now White-Seeded Simpson or Early Curled Simpson.

Cos lettuce was common during the 18th century.  Accounts such as the one from “The New London Family Cook” instructing the gardener to tie up the leaves of cos lettuce, “the same as endive”, to shield the inner leaves from the sun rendering them tender and crisp indicates that without special care some lettuce was tough.  The center leaves would have been preferred for salads while the outer leaves would have benefitted from cooking.

Jamie Oliver's braised peas with spring onions and lettuce

Jamie Oliver’s braised peas and lettuce

Lettuce that formed a loose head was called cabbage lettuce and that which produced tall leafy to very loose-headed plants was cos.  The varieties were divided further by season – that which could withstand a European winter, spring lettuce that headed rapidly, summer lettuce which were usually larger than spring lettuce and which tolerated more heat without bolting as fast.  Cutting lettuces never form a head and are harvested a few leaves at a time as the plants grow.  This is sometimes referred to as cut and come again.  Southern Europe also had a, “perennial lettuce”, which resembled dandelion.

Lettuces varied in depth of color from very pale to very dark green.

In John Randolph’s eminent Gardening Treatise penned in 18th century Virginia, we see the cutting lettuce, Cabbage lettuce, and cos.  Randolph found the cabbage lettuce the least pleasing of the three.  “This sort of lettuce is the worst of all the kinds in my opinion.  It is the most watery and flashy, does not grow to the size that many of the other sorts will do, and very soon runs to seed”.

Randolph found the cos the, “sweetest and finest”, because it washed the easiest, it remained longer before bolting, and, it was the, “crispest and most delicious of them all”.

Salads, raw and cooked, date to ancient times, however, here we will look only at ways in which lettuce was cooked.  It was put into soup, made into ragout, cooked with green peas, etc.  Elizabeth Lea [1859] had this advice for her readers, “Where there is a large family, it is a good and economical way to cut the fat of ham in small pieces, fry it, and make a gravy with flour, water and pepper to eat with lettuce.  To cook lettuce you must fry a little ham; put a spoonful of vinegar into the gravy; cut the lettuce, put it in the pan; give it a stir, and then dish it”.  Your author remembers the delight of eating this prepared by her aunt Dora, who was a master of the “use what’s in the garden and larder” method of cooking before it became trendy with preppers.

Vilmorin

TO MAKE GREEN PEASE SOUP.  “The New Book of Cookery”.  1782.  Take a small knuckle of veal, and a pint and a half of old green pease; put them in a saucepan with five or six quarts of water, a few blades of mace, a small onion stuck with cloves, some sweet herbs, salt, and whole pepper;  cover them close, and boil them;  then strain the liquor through a sieve, and put it in a fresh saucepan, with a pint of young pease, a lettuce, the heart of a cabbage, and three or four heads of celery, cut small;  cover the pan and let them stew an hour.  Pour the soup into your dish, and serve it up with the crust of a French roll.

EGGS WITH LETTUCE.  “The Art of Cookery, Made Plain and Easy.  Glasse.  1786.  Scald some cabbage-lettuce in fair water, squeeze them well, then slice them and toss them up in a saucepan with a piece of butter;  season them with pepper, salt, and a little nutmeg.  Let them stew half an hour, chop them well together; when they are enough, lay them in your dish, fry some eggs nicely in butter and lay on them.  Garnish with Seville orange.

TURKISH MINCE.  “Domestic Economy and Cookery”.  1827.  Mince hard [boiled] eggs, white meat, and suet in equal quantities, season with sweet herbs and spices, mix it with boiled chopped lettuce, bread crums [sic], a little butter and a raw egg or two; dip lettuce, vine, or cabbage-leaves into boiling water, roll up the mince in them, and fry them of a nice light brown, or bake them in a quick oven, buttering them from a buttering pan, which is a better method than laying on bits; when rolled up for frying, fix the leaves with a little egg; meat may be used instead of egg.

LAITUES AU JUS.  “How to Cook Vegetables in one Hundred Different Ways”.  1868.  Blanch the lettuces for about five minutes in boiling water, drain them; place some nice slices of bacon in a stewpan;  lay the lettuces upon them; add sufficient strong gravy [broth];  simmer for a quarter of an hour, and serve with the strained gravy.

LAITUES FARCIES.  “How to Cook Vegetables in one Hundred Different Ways”.  1868.  Remove the outer leaves from some good large white lettuces, blanch these for a few minutes in boiling water;  drain them;  make them hollow by cutting out from the stalk end;  fill them with a very good white forcemeat, and stew them gently in consommé, or braise them.  Serve with the gravy poured over.

LETTUCES—LAITUES AU LARD.  “The Treasury of French Cookery.  1866.  The salad being made, salt and pepper are added in the requisite quantities.  Cut bacon up in small dice.  Melt it in a heater [cook].  Pour it very hot over the lettuces.  A little vinegar is immediately put into the heater, and when warm is poured over the salad.

LETTUCE SOUP.  “The Master Books of Soups”.  1900.  2 pints veal stock, 1 large head of lettuce, 1 oz. butter, 1 oz. flour, 1 tablespoon lemon juice, salt and paprika.

Cook lettuce in 1 pint of the stock and press through a sieve.  Heat butter in a pan and add flour and the other 1 pint of stock.  Cook till smooth and creamy.  Add lettuce pureé, season to taste, re-heat, add lemon juice, and serve.

“Inferior heads, or the lettuce which does not form heads, is very nice if cooked just like spinach and dressed with cream.  Some varieties which have large white veins and mid-ribs may be made to serve a double purpose.  Strip out the thin parts of the leaf for use in the salads and then cook the stems and dress them just like asparagus.  It will make a substitute for asparagus which will go unsuspected with a good many people”.  – Cutler.  1903.

See:  Vilmorin-Andrieux, “The Vegetable Garden”, 1920.  Randolph, John, “A Treatise on Gardening”, mid-18th c.  Weaver, William Woys.  “Heirloom Vegetable Gardening:  A Master Gardener’s Guide to Planting, Seed Saving, and Cultural History”.  1997.  Weaver.  “100 Vegetables and Where they Came From”.  2000.  Lindquist, K.  “On the Origin of Cultivated Lettuce”.  Landskrona, Sweden.  April 1960.  Eaton, Katherine.  “Ancient Egyptian Temple Ritual:  Performance, Pastterns, and Practice”.  2013.  Cookery books listed above.

CELERY: More than Mirapoix©

27 Monday Aug 2018

Posted by thehistoricfoodie in 19th century food, early household items, gardening, historic food, Table manners and etiquette, Uncategorized

≈ 5 Comments

Tags

celery dish, celery glass, celery vase

Not all modern gardeners have grown celery so one might doubt its popularity in times past, but I have yet to see a gardening treatise or catalog that doesn’t discuss growing celery.  Cookery books encouraged the liberal use of it as a seasoning and as a salad which might have been as simple as crisp celery in a celery vase.

0eddbc1c3f31382a7f65ca35f4e8d887--vintage-vases-pressed-glass

The Victorian celery vase or glass was an essential part of a well-dressed table from the 1820’s into the 1910’s although some journals advised readers the celery vase was being phased out in favor of a boat-like dish in the 1890’s.  The vases grew in popularity until mass-production flooded the market.

il_340x270.1564008042_mq5v

“Celery is sometimes chopped small and mixed with a dressing made as directed for lettuce; but the usual way of preparing them is to scrape and wash them clean, and let them lie in cold water till just before they are to be sent to the table; then wipe them dry, split the ends of the stalks, leaving on a few of the green leaves, and send them to table in celery glasses.  Celery should be kept in a cellar, and the roots covered with tan to keep them from wilting.”  – The Kentucky Housewife.  1839.

j546_cel_pi_2000x

When celery was served at table, those who desired to do so, helped themselves to a stalk, dipped it in a little salt on one’s plate and ate it.  The celery was expected to be tender and crisp when served alone.  “To Crisp Celery.  Let it lie in ice water two hours before serving.  To fringe the stalk, stick several coarse needles into a cork and draw the stalk half way from the top several times, and lay in the refrigerator to curl and crisp”.  – Vaughn’s Seed Store.  1898.

7bd5dd0b16ca2ab5b1eadd07777ea50e      PanelPalmRoseCeleryVA  406076852f28e61b835090032317ba40


7db6eb28bc039acaf49a97791e1f951f--cranberry-glass-celery   ec2b15feb1cd344a71a6583203d65938

421577430_fullsize

Celery was no exception to the “waste not,  want not” approach to food.  “There need never be any part of a bunch of celery wasted.  Serve the small, white stalks whole with salt, or cut fine and dressed as a salad.  Cut the larger stalks into short pieces, cook in boiling salted water and cover with cream sauce.  The very coarsest pieces may be boiled and strained for soup.  Nearly all soups may be improved by the addition of celery.  Dry the leaves in the oven, then chop or rub fine and they are nice for seasoning soups”.  1904.

Now, gentle reader, let us look at recipes for various prepared dishes of celery which might dress our table for that next special occasion meal.

Celery Salt.  1904.  This is very nice to season oysters, gravies, soups, etc.  Dry and grate the roots of celery and mix with one-third the quantity of salt.  Put into bottles and keep tightly corked.

Celery Fried.  1786.  When boiled, dip it in batter, fry it of a light brown, and dry; pour over melted butter.

Celery to fry.  1818.  Cut off the heads, and green tops of six or eight heads of celery; take off the outside stalks, pare the roots clean have ready half a pint of white wine, the yolks of three eggs beaten fine, salt and nutmeg; mix all together with flour into a batter, into which dip every head, and fry them in butter; when done, lay them in your dish, and pour melted butter over them.

Celery Sauce.  1818.  Boil celery heads three inches long, in a little stock, till nearly done and the liquor almost wasted away, then add some béchamel. . .

Celery Fritters.  1909.  Make a batter of two eggs, one cupful of milk, a tablespoonful of melted butter, one cupful of flour, and a pinch of salt.  Boil until tender in salted water stalks of celery cut into four inch lengths, drain, cool, and dry.  Dip in batter, fry in deep fat, drain, and serve with Hollandaise Sauce.

Creamed Celery.  1909.  Clean, trim, and cut the celery into short pieces.  Boil until tender in salted water, drain, and reheat in a Cream Sauce.  Sprinkle with grated nutmeg if desired.  Diced cooked carrots may be added to Creamed Celery.

Cabbage and Celery Cooked.  1909.  Cut cabbage fine, and soak in salt water, drain and add equal amount of chopped celery, cook until tender, drain and sift a little dry flour over the hot cabbage and celery, cook the flour, add milk, when done add one beaten egg; serve at once.

Escalloped Celery.  1909.  Chop celery very fine or cut in half-inch lengths and cook until tender in boiling salted water to cover.  Drain and reheat in a cream or White Sauce.  Put into a buttered baking-dish in layers, sprinkling each layer with grated cheese or crumbs or both crumbs and grated cheese.  Have crumbs and cheese on top, dot with butter, and brown in the oven.  Oysters also may be put between the layers.

Celery-Potato Croquettes.  To a pint of mashed potatoes add half a teacup of cooked celery, season with a tablespoon of butter, half a teaspoon of salt, a dash of white pepper; add the yolk of one egg.  Roll in shape of a small cylinder three inches long and one and a fourth inches thick.  Dip them in the beaten white of egg, roll in cracker or bread crumbs and fry.

Cream of Celery Soup.  1909.  One-third cup of celery cut in pieces, two cups of boiling water, one sliced onion, two teaspoons of butter, three tablespoons of flour, three cups of milk, salt and pepper to taste.  Cook celery till soft, rub through sieve, scald milk with onion in it, add to celery, bind and season.

Stuffed Celery.  1913.  Mix cream cheese with enough cream to moisten it; season with salt and cayenne; chop 8 olives and ½ lb. English walnuts and mix with cheese.  Select short wide pieces of celery, trim off most of the leaves and fill with cheese mixture.

Scramble or Fry? Oh My!

20 Wednesday Jun 2018

Posted by thehistoricfoodie in 17th century food, 18th century food, 19th century food, Colonial foods, Self-sufficiency, Uncategorized

≈ Leave a comment

Tags

egg recipes

2879_alt1

“In all times and in all ages, among all races and in all lands, as far back as written history and tradition can be traced, the egg has ever been regarded as chief among Nature’s most precious gifts to mankind”.  No truer statement has ever been made.  Eggs as food are dateless, and recorded recipes date from those of Apicius, famous epicure of ancient Rome.  Preparation techniques changed little initially, but in 1665 Robert May told readers about sixty-two ways of cooking eggs.

diego-velazquez-an-old-woman-frying-eggs_a-l-2582251-8880731

Any bird or reptile which lays eggs may nourish a human whether it be lizard, alligator, fish, turtle, terrapin, turtle, water bird, etc. On the farm we eat duck, goose, and turkey eggs right along with the chicken eggs.

I tailor my usage according to what my hens produce and have not bought eggs in almost four years.  When my hens lay extra eggs I can look for recipes which require a larger number of eggs.  Let’s look at ways great grandma might have prepared her eggs.

The most important advice pertains to determining freshness unless gathered faithfully daily.  I use the floating in water method, keeping sinkers, discarding floaters and any that stand on end more than a slight degree.  Boiled freshly gathered eggs do not peel well.

“Eggs are not fit for any purpose unless they are perfectly fresh.  An easy method of ascertaining the freshness of an egg is to hold it toward the sun or toward a good light.  If fresh, it will be perfectly clear; if it is clear on one side and cloudy on the other, it is stale.  Another good test is to place the eggs in a pan filled with water; those that sink to the bottom are perfectly fresh; if they float at the top or stand on end in the water, they are unfit for use”.  Filippini, Alexander.  “One Hundred Ways of Cooking Eggs”.  1892.

EGGS TO CODDLE.  Mrs. Bliss.  “Practical Cook Book”.  1850.  Break the eggs and slip them separately, so as not to break the yolks, into a stew-pan of boiling water, let the whites just set, then take them up in a skimmer, drain off the water, and serve on slices of buttered toast.

EGGS AND TOMATOES.  Bliss.  Peel six tomatoes and cut them in slices into a stew-pan, add two table-spoonfuls of butter, a little salt and pepper; when they begin to stew, break in six eggs, stir well, and serve.  This is a nice dish for breakfast.

EGGS A LA DEUX.  “Better Food”.  1917.  Cut four hard-cooked eggs in slices, add one cup of tender cooked ham cut in cubes, half a cup of fresh mushrooms broken in pieces, and two cups of white sauce.  Mix lightly, turn into a baking dish, cover with buttered crumbs and let bake until the crumbs are browned.

SCALLOPED EGGS WITH CHEESE.  “Twentieth Century Cook Book”.  1921.  4 hard-cooked eggs, 2 cups White Sauce, ½ cup cheese cut fine, ½ cup buttered crumbs.  Cut eggs in eights lengthwise; put half of them into a greased baking dish, cover with half of sauce, and sprinkle with half of cheese; repeat; cover with crumbs, and bake about fifteen minutes or until crumbs are brown.  [These were also called Eggs Au Gratin.  We had this for Father’s Day breakfast].

ASPARAGUS A LA WESTMINSTER.  Frich.  “The Housewife’s Cook Book”.  1917.  Buttered toast, scrambled eggs, grated cheese, white sauce.  Arrange scrambled eggs on buttered toast, asparagus on top of scrambled eggs, and grated cheese on top of asparagus.  Serve with hot white sauce.

EGG CROQUETTES.  “The Home Cook Book”.  1905.  Boil four eggs till they are perfectly hard.  Then rub through a fine sieve [mash], add three tablespoons of cream, a dash of pepper, a saltspoon of salt, and stir well all together.  Add also a teaspoon of butter.  Stir thoroughly and thicken with pulverized cracker stiff enough to form into balls.  Make up in little balls, roll each ball in cracker dust and drop into deep, hot fat.  When the croquettes are brown, take out with a perforated or wire spoon and drain.  Serve with crisp, hot bacon or cold with a lettuce salad.

Picklegegg

PICKLED EGGS.  Home.  1905.  First boil the eggs half an hour.  Drop them in cold water to cool, remove the shells and put the eggs in an earthen or glass jar.  Cover them with hot vinegar.  Or if you wish to give them a spiced flavor, pour over them vinegar in which peppers, allspice, cardamom seeds, and cloves have been boiled. . .Let them stand twenty-four hours before serving.  [Pickled eggs are a tremendous time saver when making salads and add a bit of extra flavor].

BAKED EGGS WITH MASHED POTATOES.  “The Rural Cook Book”.  1907.  The potatoes should be well seasoned, and beaten smooth with hot cream or milk and butter, so they will be very light.  Put in a buttered baking dish, and then . . . make deep little hollows in the potatoes.  Drop an uncooked egg carefully into each of these hollows, dust with salt and pepper, and dot the top with bits of butter; set in the oven until the eggs are cooked and serve at once.

STEWED SPINACH AND EGGS.  Glasse, Hannah.  “The Art of Cookery”.  1788.  Pick and wash your spinach very clean, put it into a saucepan, with a little salt; cover it close, shake the pan often.  When it is just tender, and whilst it is green, throw it into a sieve to drain, lay it into your dish.  In the mean time have a stew-pan of water boiling, break as many eggs into cups as you would poach.  When the water boils put in the eggs, have an egg-slice ready to take them out with, lay them on the spinach, and garnish the dish with orange cut into quarters, with melted butter in a cup.

← Older posts

Archives

  • August 2022 (2)
  • July 2022 (1)
  • April 2022 (1)
  • February 2022 (1)
  • October 2020 (2)
  • August 2020 (2)
  • July 2020 (2)
  • March 2020 (1)
  • July 2019 (1)
  • March 2019 (1)
  • February 2019 (4)
  • January 2019 (1)
  • October 2018 (1)
  • September 2018 (1)
  • August 2018 (2)
  • July 2018 (1)
  • June 2018 (2)
  • May 2018 (3)
  • April 2018 (2)
  • March 2018 (7)
  • February 2018 (1)
  • December 2017 (3)
  • November 2017 (1)
  • September 2017 (2)
  • June 2017 (1)
  • May 2017 (1)
  • March 2017 (1)
  • February 2017 (4)
  • January 2017 (1)
  • December 2016 (2)
  • October 2016 (2)
  • August 2016 (5)
  • July 2016 (2)
  • June 2016 (3)
  • May 2016 (7)
  • February 2016 (1)
  • January 2016 (8)
  • September 2015 (2)
  • July 2015 (1)
  • February 2015 (3)
  • January 2015 (2)
  • December 2014 (1)
  • November 2014 (2)
  • October 2014 (3)
  • August 2014 (6)
  • July 2014 (8)
  • June 2014 (8)
  • May 2014 (11)
  • April 2014 (4)
  • March 2014 (5)
  • February 2014 (4)
  • January 2014 (4)
  • December 2013 (3)
  • November 2013 (2)
  • October 2013 (4)
  • September 2013 (8)
  • August 2013 (1)
  • July 2013 (10)
  • June 2013 (2)
  • May 2013 (3)
  • April 2013 (10)
  • March 2013 (4)
  • February 2013 (3)
  • January 2013 (13)
  • December 2012 (13)
  • November 2012 (4)
  • October 2012 (1)
  • August 2012 (3)
  • July 2012 (12)
  • June 2012 (5)
  • May 2012 (5)
  • April 2012 (4)
  • March 2012 (8)
  • February 2012 (1)
  • January 2012 (5)
  • December 2011 (10)
  • November 2011 (2)
  • October 2011 (3)
  • September 2011 (4)
  • August 2011 (7)
  • July 2011 (10)
  • June 2011 (6)
  • May 2011 (1)
  • March 2011 (1)
  • December 2010 (2)
  • November 2010 (2)
  • October 2010 (3)
  • December 2009 (1)
  • June 2009 (13)
  • May 2009 (10)
  • April 2009 (9)
  • March 2009 (1)

Enter your email address to subscribe to this blog and receive notifications of new posts by email.

Join 526 other subscribers

Create a free website or blog at WordPress.com.

Privacy & Cookies: This site uses cookies. By continuing to use this website, you agree to their use.
To find out more, including how to control cookies, see here: Cookie Policy
  • Follow Following
    • Thehistoricfoodie's Blog
    • Join 478 other followers
    • Already have a WordPress.com account? Log in now.
    • Thehistoricfoodie's Blog
    • Customize
    • Follow Following
    • Sign up
    • Log in
    • Report this content
    • View site in Reader
    • Manage subscriptions
    • Collapse this bar
 

Loading Comments...
 

You must be logged in to post a comment.